Free Custom Email for Your Domain: How to Set Up Email Forwarding with Google without Google Workspace
02/17/2023
domain, google domains, gmail

Are you considering using a custom email address with your newly purchased domain but hesitant to invest in Google Workspace? Well, here's some good news! You can take advantage of Google's email forwarding feature for free, without the need for a paid Google Workspace subscription.
This can be a great solution for individuals and small businesses who don't have a large team to manage their email communications. In this blog post, I will walk you through how to set up email forwarding and alias with Google to send and receive emails as your custom domain email.
Email forwarding setup
Suppose you have recently purchased a domain name, dawid.app, and now you want to be able to send and receive emails using the email address hello@dawid.app. To set this up, you will need to create another free email account on Gmail, which will be used for forwarding emails from your custom to your personal email address. This additional email account can be one that you've used before or you can create a new one using Gmail.
We will begin by setting up email forwarding from your custom domain email to your personal @gmail.com email. In this example the personal email will be dawid.a@mail.com.
Step 1: Begin by logging into your domains.google account at https://domains.google.com/.
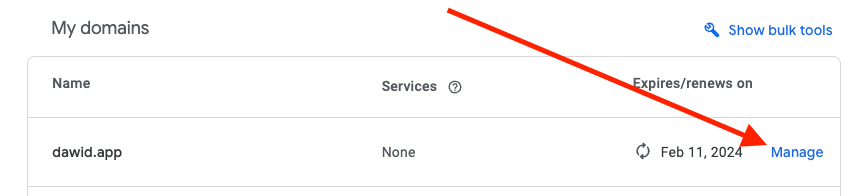
Step 2: Click manage on the domain you want to set up your custom email for:
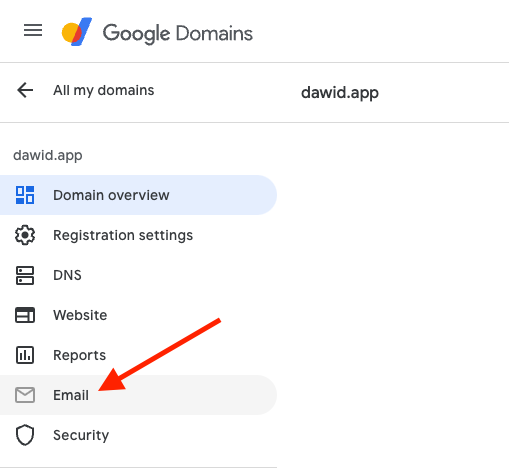
Step 3: After navigating to your domain, navigate to the email section on the left sidebar
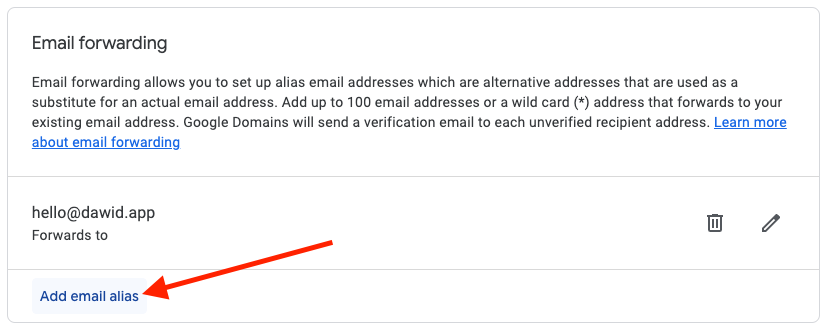
Step 4: In the email panel, on the right, scroll down to the Email forwarding section and click on Add email alias
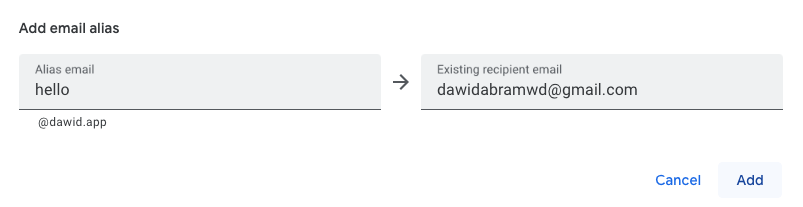
Step 5: In the left field input the alias you want to use for your custom domain email. In this example it will be hello as we are going for hello@dawid.app. In the right field input your personal existing gmail email. The one to which the emails will be forwarded to.
Step 6: If the personal email you input in the previous step owns the domain you should be able to skip this step. Else you will receive a confirmation email on the personal email, to confirm it is you are trying to set up the forwarding. Therefore, log in to your personal email and verify it is you setting it up.
Aaand for the forwarding we are done! 🎉
The email forwarding should now work. Whenever someone sends email to hello@dawid.app you will receive those emails on your personal gmail account. You won’t be able to send emails from the custom domain email just yet, this is what we will solve in the next section.
Sending emails from your custom domain email
We can receive emails sent to our custom hello@dawid.app email, but we want to also be able to send emails from it to our customers. Let’s work on that.
Step 1: Log into your personal gmail account to which you forwarded emails to in the previous section. When logged in, in the top right corner of your screen, click on your avatar and navigate to Manage your Google account.
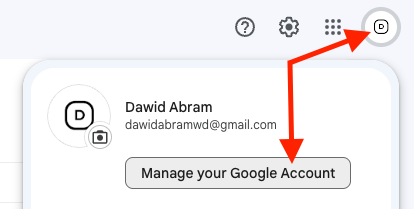
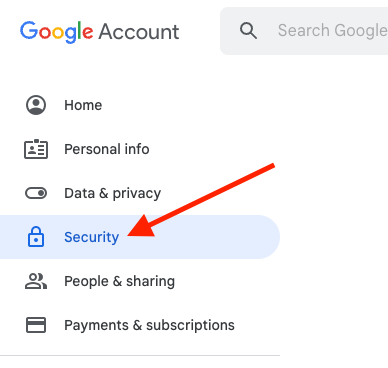
Step 2: On the left sidebar navigation click Security
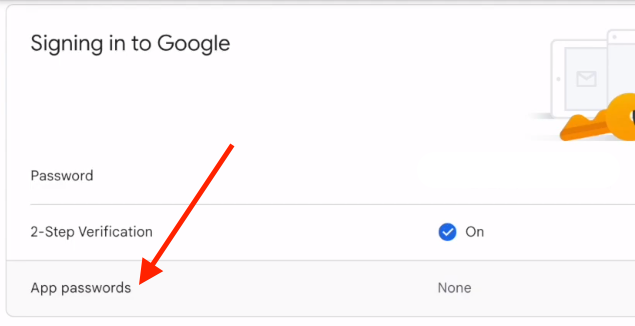
Step 3: Under the section called Signing in to Google you should see 2-Step verification. If you don’t have 2-Step verification set up, you will have to do that first. After that you will be able to set up the App passwords which is what we want, so click on that.
Step 4: After clicking on App passwords Google will probably ask you to log in again for security purposes, so let’s log back in.
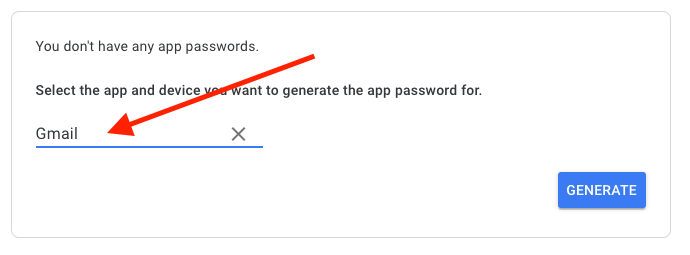
Step 5: Click on Select app and select the Other (Custom name) option
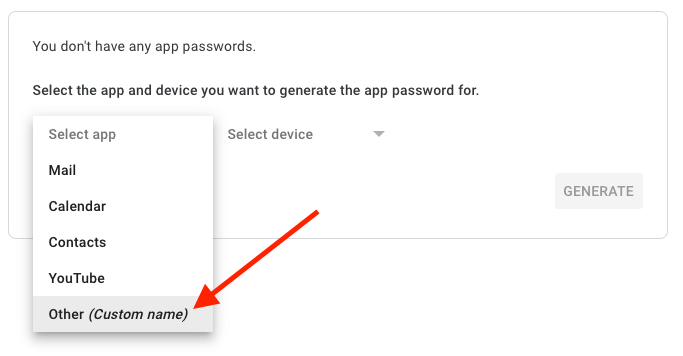
Step 6: In the input that appeared make sure to enter Gmail and then press GENERATE
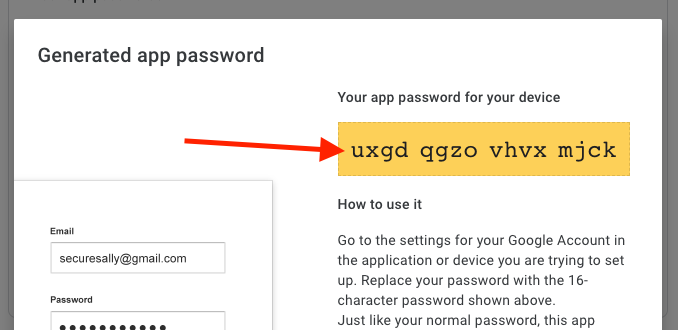
Step 7: You will now see a dialog with an App password for your device. Copy this password.
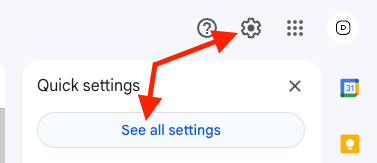
Step 8: After copying the password, navigate to your personal gmail account. In the top right corner of the screen click on the cog wheel and on See all settings
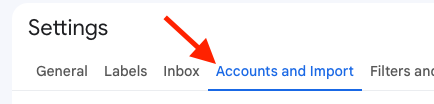
Step 9: In the Settings navigate to the Accounts and Import tab
Step 10: Under the Send mail as section click on Add another email address

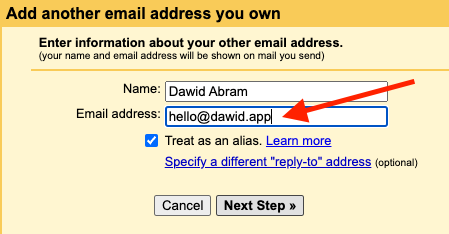
Step 11: Google will open a new window for you where you will now be able to set up an alias for the custom email. In the Email address field type in the custom email address you are setting it up for. For the example we are setting it up for hello@dawid.app
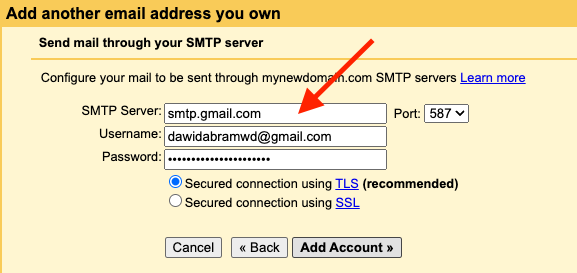
Step 12: On the next step set the SMTP Server to be smtp.gmail.com. For the Username enter your personal email, not the custom email here. For the password paste in the password you copied in Step 7. Then press Add Account
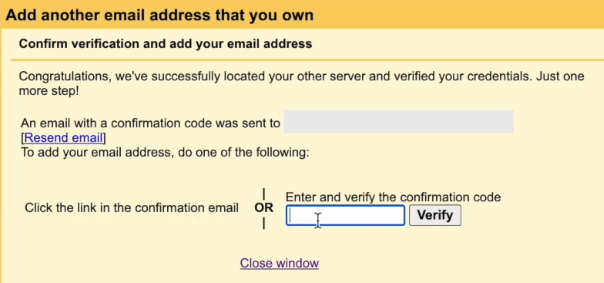
Step 13: You will now see a confirm verification screen, meaning that all that's left is to confirm on the personal email. Navigate to your email and confirm it. (It will say the email was sent to is your new custom email, but if you followed the first section of this tutorial then you will simply receive that email on your personal email you set it up for)
You can now receive as well as send emails from your new custom domain email! 🎉
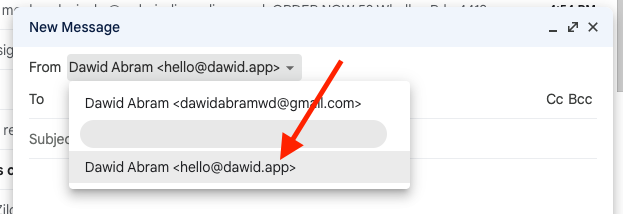
When sending emails, when you want to send an email as the new custom email, simply click on the From field and select the custom email you want it to be sent from.
What if you point your domain to your websites host name servers?
You may have changed the name servers of your domain to point it to your website's hosting provider in order to get your website up and running. However, this action can result in an unexpected problem - your email forwarding breaks. This means that while you can still send emails from your custom email address, you may not be able to receive any incoming emails. This can be a frustrating issue, but don't worry - we will fix it by doing the following.
Simply add MX records in your website’s hosting provider to Google.
The values have to be as following:
| Name | Type | TTL | Priority | Value |
|---|---|---|---|---|
| Blank or @ | MX | 1H | 5 | gmr-smtp-in.l.google.com |
| Blank or @ | MX | 1H | 10 | alt1.gmr-smtp-in.l.google.com |
| Blank or @ | MX | 1H | 20 | alt2.gmr-smtp-in.l.google.com |
| Blank or @ | MX | 1H | 30 | alt3.gmr-smtp-in.l.google.com |
| Blank or @ | MX | 1H | 40 | alt4.gmr-smtp-in.l.google.com |
Final thoughts
Congratulations! With domain email forwarding now set up, you can enjoy the benefits of a professional-looking custom email address for your domain, allowing you to send and receive emails seamlessly. This easy-to-implement solution is especially ideal for individuals and small businesses looking to establish a professional online presence without incurring additional costs. I hope this guide has been helpful in providing you with the necessary steps to set up email forwarding for your domain.
Happy emailing and thanks for reading! ❤️
Also be sure to check out my youtube channel if you haven't yet